III. How to create a new state of play?
1. Select "New State of play"
To create a new stage of the place, press the icon (+) at the top right,, go to the "Enteries" menu for an inventory of entry and the "Outputs" menu if it is an exit.
2. Inform coordinates of different parties
For example, presson "Select a proprierie taire"(so for the choice of tenants, co-tenants, collaborators, etc.).
Nb:The employee is the agent connected to Startloc, which is inserted automatically.
Nb:The employee is the agent connected to Startloc, which is inserted automatically.
3. Search for your contact or click on "Add"
If your contact person (for example, the owner) has been added to Startloc when you have it in the contact directory, you will only have typed their name in the search bar. If this is not the case, click the button "Add a landlord", a new window is then displayed.
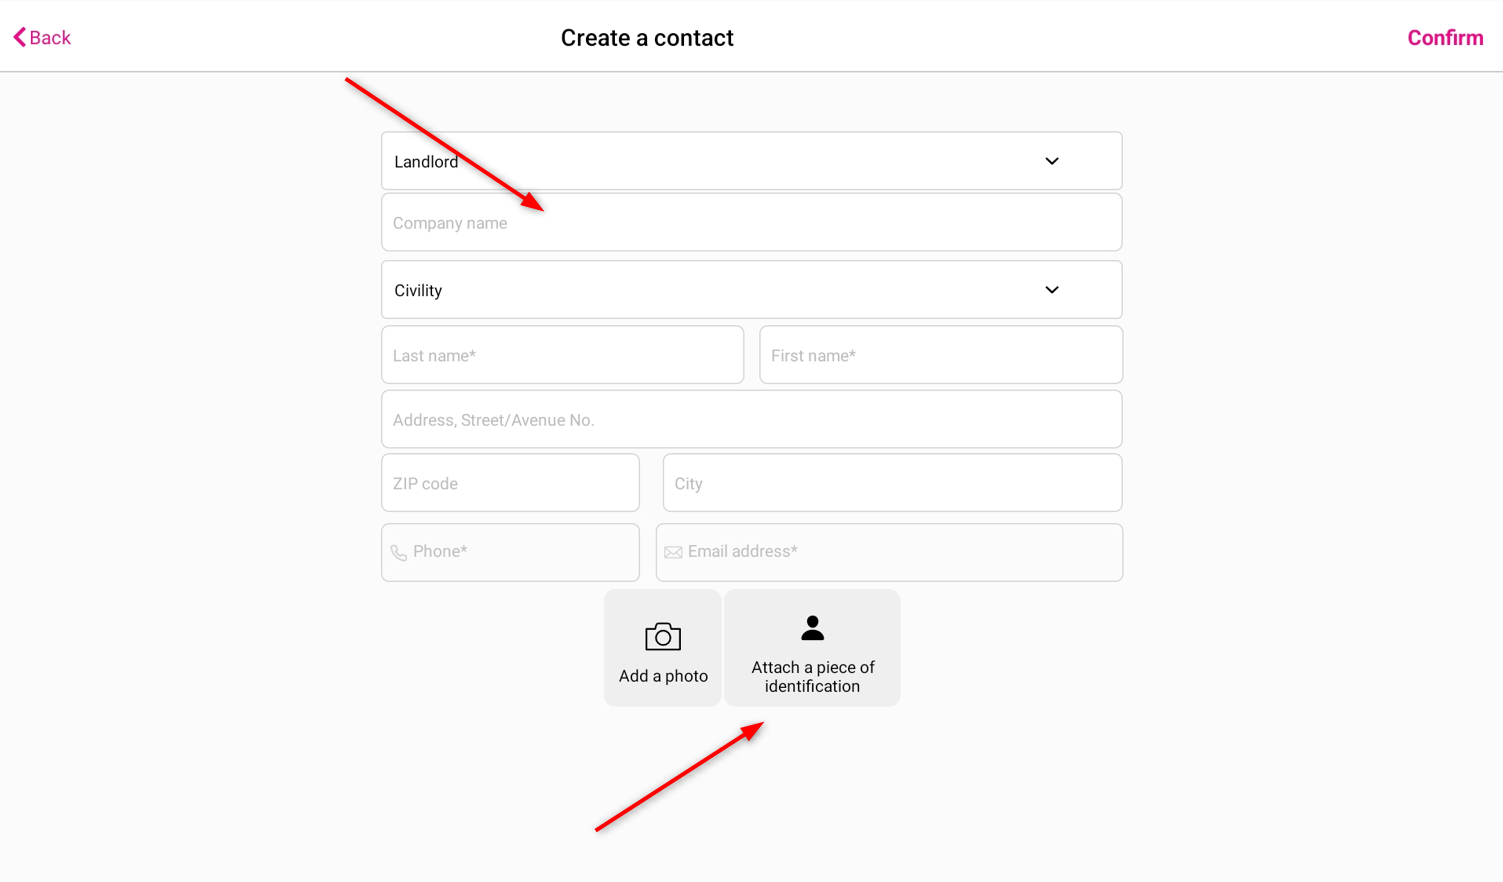
4. Add an owner (or tenant, employee..)
If you clicked to "Add" (addfor example), a sheet"Prethen, you will only have to click on the various areas "Name", "Previous name", " name", "civility", etc. to fill out the form. You also have the opportunity to take a photo or attach your client's identity. Then click on "Validate" at the top of the right.
5. Election or add a property
You will have to start up or add a property before you stop your premises. To do this, press "Select a property", the following step is displayed.
6. Search for your property or click on "Add"
If the property has been added to Startloc when you have a pre-date of the premises or if you have registered it in the search bar. If this is not the case, click on “add” on the right, a new window will then appear.
7. Add a property
If you clicked on "Add Real Property", you will be asked to fill in the address of the property and its internal re-establishment.To do this, click on the various areas "Internal reference", "ZIP Code", "City", etc... to display the text boxes and complete the entry of your property. Seizure of the type of property is in the next step.
8. Select the type of property and its characteristics
If you have selected the type of property, then you can understand the characteristics of the property such as the number of parts, the type of heating/hot water.
9. Select Schedules to the property
To select an annex, click on the button of the chosen annex, it then colores. To be selected, click on the button. When you have finished seizing the various caract rents of the property, click on "Validate" at the top of the right.
10. List of parts
The differences of your age of placesappear on the left at a time 2/4 depending on the date. To delete a room, tap, drag to the left, so there appears a trash icon, click on it. To add a room, click on the "Add a room" button. The next step is then displayed.
11. Add a room
If the trap has been added to Startloc when you are used to startloc when the site, you will only have scream its name in the search bar (or search for it in the list). If this is not the case, click "Add a room", and then give a name to your room.
12. Selecting a room
To select a , press the punder "Rooms" (column on the left), it then appears highlighted color.
13. Detailed development elements
Depending on what you will have been selected (1st column), the main elements ofwill be automatically added to the 2nd column. To identify an eÌ and check your e e tat, press the element once, it then appears highlighted, and a third column is added with the condition coating, waking, and visual misconduct.
14. Specify the condition of an element
After pressing the word "Condition" in columnon the right, the window below appears, you will then be improved either to choose your eÌ tat, or to add one by clicking on "Add another condition", so add a wording and then validate at the top to the right.
15.Election a type of coating
To begin a dream, press the word awfully in the right-hand column, a similar preparation to the preparation of this appears, you will then be improved either to choose your dream, or to add one by clicking on "Add coating"", so add a label and validate at the top right.
16. Add a cosmetic flaw
To select a cosmetic flaw, press the visual fault word on the right column to add some.
17. Selecting a Cosmetic flaw
To select a cosmetic flaw, press the "Cosmetic flaw" button in the right column, a similar to the pre-dent appears, you will then be raised either to choose your fault, or to add one by clicking on "Add another cosmetic flaw", add a labell and validate at the top of the right. Keep in mind that you can change the quantity for each fault.
18. Visual and quantitative impairment
Once the cosmetic flaw is added, it appears well with its quantity.
19.Take a photo to describe the state of an element
To take a picture of a description and illustrate a description, tap any iconof the camera on the right. The camera then starts. Position the camera as desired to get the best possible image and then take the picture. It then appears on your right. Note that you also have the option to import a photo from your device's gallery.
Nb: 6 photos by the maximum
Nb: 6 photos by the maximum
20. Edit or delete a photo
To edit or delete your photo, tap the photo directly. To edit the photo and display a need, click on "Edit Photo", the photo is then displayed in large format up to the next level, you can then draw on it to highlight detail detail. To delete the photo, select the icicone from the trash can and confirm the deletion. An option to replace the photo (button "change photo") is also available.
21. Surround a fault in the photo
Surround or highlight your needs in the photo using your finger or stylus and then click Save at the bottom right. The photo appearsthen a change.
22. Add a comment
To add a comment on an element and therefore provide more description, press the rectangle at the bottom, "Comments", you can then type your text.
23. Add an element
For example, press the small sign "+" of the decoration line. The next window is then displayed as pop-up. To add a system for heating or any other equipment, click on the site, then on the small sign "+". The rest of the procedure is the same.
Look for your experience in the search bar, or click on the small "+ Add a ... ". You will be able to type the word of the desired and to be used to "validate". It then appeared under the other elements in the 2nd column. You can then click below to scream his condition, his dreaming and a wind of visual need.
24. Select several elements
To choose several elements at once, simply press the different titles in the list, which appear checked when they are selected. Then click on "Confirm" at the top of the right.
25. Detailed electricity and heating elements
To detail the elements regarding electricity and heating, press on the title "Electricity / Heating," the menu will then expand. You will be able to detail the various pre-configured elements by specifying the condition, quantity, any visual defects, or add additional elements by pressing the "+" to the left of the electricity heating title.
26. Add equipment
To add equipment, press on the title "Equipment," which will appear in bold and colored, then on the small "+" sign. You can either search for your equipment in the suggested list, search for it via the search bar, or select "Add" and enter your own label. Then specify the condition, quantity, and any visual defects (as explained previously).
27. Indicate meter surveys (water, electricity, gas ..)
have a size of your different levels and thepress the "3 Various" step button at the bottom. Then press the title "counters", the main basic "Counters" then appear below. To delete one, use the button and drag to the left. To add one, click "+".
Select the counter desired souhaite (1), then indicate the date of release by selecting one day in the calendarThen indicate the results, the location of the counter, and some comments by pressing different areas. "Reups digest your text" (3) appear in which you can type useful information.
28. Add comments/reservations on the property
To add comments or remarks about the property in general, press on the title "Comments," which will then appear in color. You can then type your text into the various text fields.
29. List the different key and their quantities
To list the key differences of the property,check the corresponding lines(1) and then on the small "+ " to a list of keys to add the quantity(2). You can add a non-existent key and choose the label (3). You can also add photos and a comment.
30. Notify the dates of the home insurance contract
Select the title "Insurance" to pre-designthe effective and end dates of the housing contract. 2 calendars then appear, you will only have to click on the corresponding day to the date of effect on the left calendar, and then choose the corresponding day at the end of the contract on the right calendar. For more information, provide the company and insurance policy in the bottom text boxes. You can also add 2 photos and a note. Then click at the bottom on the "4 Signatures" step.
31. Amend the entry and legal end of document
The screen below appears (Step 4: Signature). You can then, if you wish, modify the document header and legal mentions. To do this, simply click on the square corresponding to the text area, then enter your own text.
32. View the state of play
To view the site before signature, click on the "View the inventory" button. The final pdf is then displayed up to the notch. This will allow you to feel it to your customers.
Nb: A signed inventory is no longer editable to avoid losing the signatures. Therefore, reviewing the inventory before signing is crucial.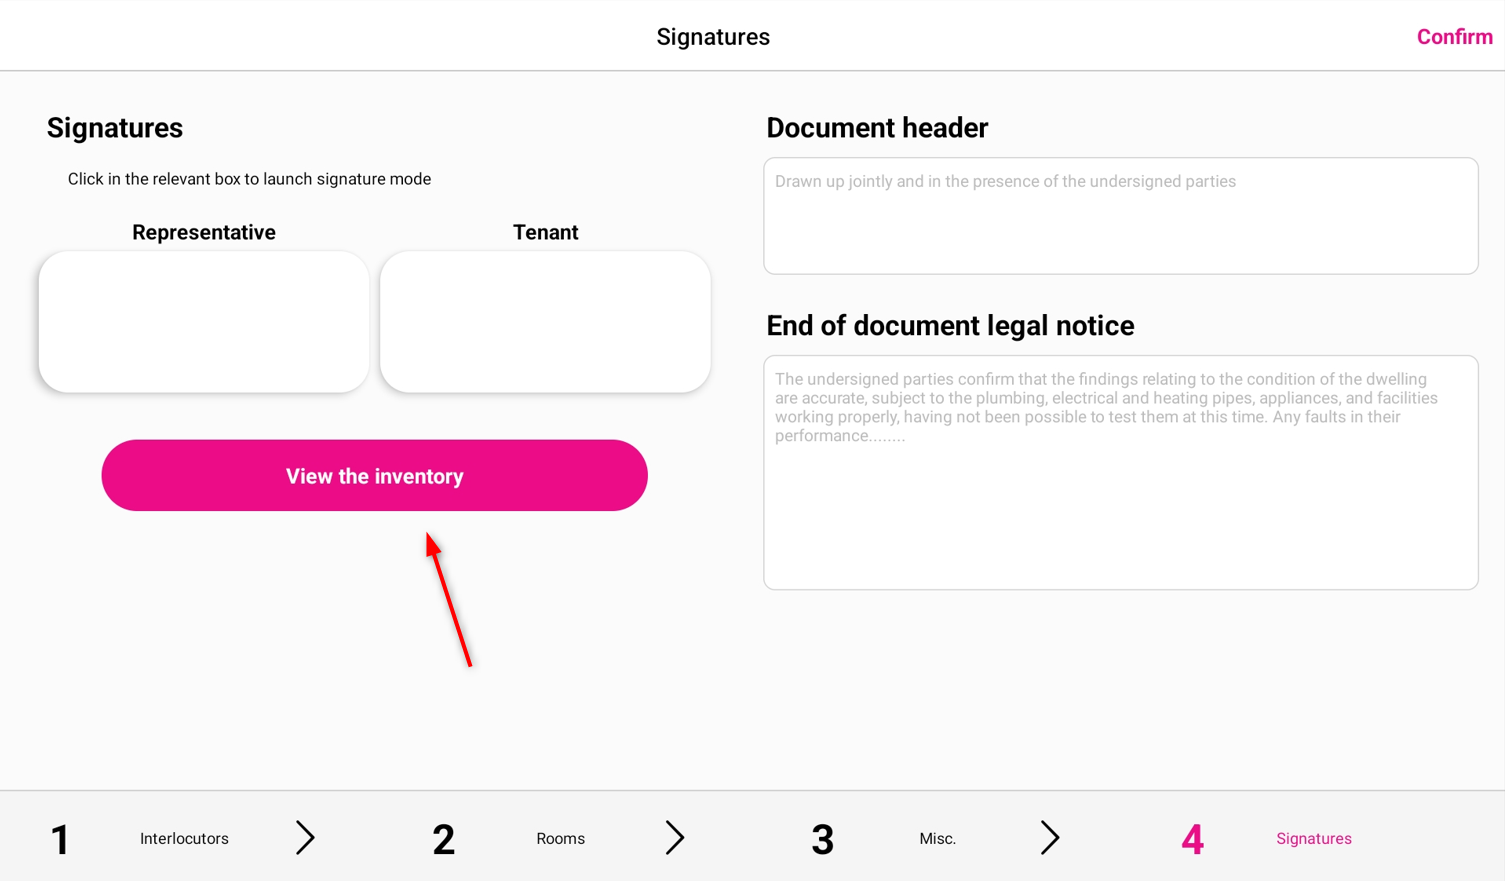
Nb: A signed inventory is no longer editable to avoid losing the signatures. Therefore, reviewing the inventory before signing is crucial.
33. Sign the state of play
Have both the representative and the tenant sign the inventory by clicking in the corresponding boxes. A window will then open with a touchpad, allowing the signer to place their signature using their finger or a stylus by simply pressing on the tablet screen. Then select "Finalize the inventory" or "Confirm" at the top right to finalize your inventory.
34. Send the state of play
To display the actions of a state of play, click it in the list. Before sending your inventory, you have the opportunity to click on "Visualize", so you will have an overview of what the customer will receive. Once everything is correct, click on the "Send" action, a window will appear and allow you to send the status of the premises by email and SMS to the various interlocutors.
Related Articles
IV. Create an inventory status from an entry and generate an incoming/exit comparison
1. Election "New inventory" To create an overview of the places of departure from one between, go to the "Outputs" section, click at the top right on the "+", "From a move-in inventory". 2. Choose the state of entry locations You will then get a list ...V. Create an inventory status from an exit
1. Election "from a move-out" To create an entry of entry locations from an exit, go to the "Move-ins" section, click at the top right on the "+" , "from a move out inventory". 2. Choose the status of exit locations You will then get a list of all ...XVII. How do I delete an element in the seizure of the state of play?
Deleting an item in the inventory entry is straightforward. Simply swipe right to left on the item you want to remove, then confirm the deletion. You can delete rooms as well as sub-items (such as decorations or equipment).X. Creating a properties template
1. Creating a property template To create a model of the places, goon your home page and then select "Property template". Then click on the "+" 2. Reference of the template Fill in the reference for the property template, you can later find your ...XI. How to Archive a inventory ?
Archiving a state of play allows you to save up to 75% space on your tablet, which is why we offer you this new solution to make space on your tablet! Automatic archiving has also been put in place on the states of old sites, allowing you to save ...